
Gtechniq C5 Wheel Armour Ceramic Coating Review
Testing a new ceramic coating on my HREs and big brake kit
I’ve been testing out different ceramic coatings on my wheels to see what works best, and I’m happy to report a new winner: GTechniq C5 Wheel Armour.
When my HREs were painted black, I used CarPro’s PERL (Plastic, Engine, Rubber, Leather) coating but I was rather unimpressed with it compared to how well the CQuartz UK did at protecting the rest of my car. It was better than nothing, but that’s about all I could say for CarPro PERL.
Instead, I wanted to try out a coating made specifically for wheels rather than a catch-all solution that claims to do many different surfaces. My suspicion of the CarPro product that was it was trying to do too much at once and as a result was only mediocre at each of the applications it was advertised to work upon. Leather and wheels are entirely different surfaces, and although I’m no chemical engineer I can’t imagine using the same detailing products on these vastly different finishes would ever be ideal.
So when I had my HRE wheels got refinished in gloss gold, I decide to try out GTechniq’s C5 Wheel Armour because it had great reviews on Detailed Image. After driving around with it installed for several months and a few thousand miles later, I’m happy to report that it is night and day better than what I had before!
Available on Amazon and Detailed Image for about $35, a 15ml bottle is more than enough to coat your wheels, brake calipers, and still have some leftover to do the job.

The application is super easy, and takes maybe 10 minutes per wheel once the wheels are prepped.
Like any ceramic coating, the hard work is all in the preptime, as when you apply the coating it is permanent and any imperfections, dust, etc. that you missed will be locked in there for good.
Luckily for me, my HREs had just been refinished and they hadn’t been driven on yet, so they needed minimal prep work to be ready…I used a few passes of CarPro Eraser to make sure there was no oils or other products on the car that impact the curing of the ceramic coating, then voila I was ready to go!
Once your wheels are perfect and you’ve used an alcohol based cleaner or a product like CarPro Eraser, simply apply the coating in small sections at a time, then let it cure for a few minutes before buffing it out. There are a ton of great videos on YouTube to explain the application process, like this one here from Adams Polishes:
Take your time applying the coating, it’s permanent so it’s better to spend some extra time now rather than regret it for years down the road. Even taking your time, this should really only take about an hour start to finish.
Once you’ve properly applied this product, give the wheels at least 24 hours to fully cure. The product will continue to harden after that, so if you see rain in the forecast then try to wait at least 72 hours before installing to give the best results.
It was hard to me to wait to see the new wheels installed, but luckily Southern California doesn’t get much rain so I only gave it 24 hours myself.
A full week is needed before the hardening is completely finished, but again 24-72 hours is sufficient to start driving on them.

What’s awesome about ceramic coatings is that it adds gloss to the finish of whatever you’re finishing. These wheels already had an amazing finish from HRE, but the ceramic coating makes them even glossier and impressive.
The other reason to install a ceramic coating is of course because it helps protect the wheels. Brake dust rinses right off now, and less brake dust seems to collect on the spokes in the first place.
To clean my wheels I only use a foam gun and regular car soap, no brushes, sponges, or any direct contact with the wheels is needed – everything rinses right off.
I also don’t need to use any harsh cleaners, and after having a bad experience with Sonax Wheel Cleaner ruining the finish on my black HREs (hence the need for them getting refinished), it’s really nice not to have to pay for or use any special wheel cleaners anymore.

Where it’s even more appreciated is the inner barrels of the wheel.
As you know, this is hard to wash this area without taking the wheels off. A wire brush can get back there, but it’s hard to apply much pressure.
The ceramic coating makes it so you probably don’t even need to touch this area, but if you do very light pressure is needed to make them look brand new again.
That’s cool.
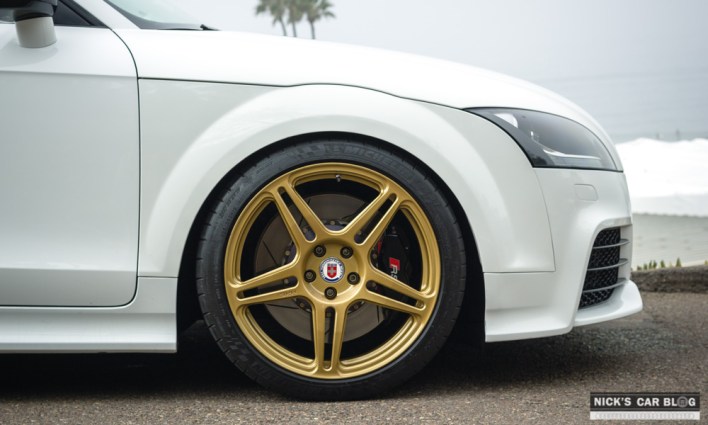
The last plug I’ll make for using a ceramic coating like Gtechniq on your vehicle is the brake calipers.
I cleaned my calipers really well and then coating them while I was at it, and I think it’s actually the most impressive part I’ve done.
My brake calipers look showroom new, and I don’t really have to work very hard at it to keep them that way. I was skeptical if this would hold up, but nearly 1,000 miles later and my brake calipers still look showroom new.

If you haven’t used a ceramic coating before, starting with your wheels is a great idea. It’s a lot easier to install than your whole car, and the effects are more obvious since your wheels tend to get dirtiest and be the most hassle to keep clean.
Best of all, you can try this out for only about $30 so if you don’t like it, you haven’t really lost much money.
As someone who has owned dozens of sets of wheels (at least), I’m glad I found this product. My TTRS currently has three sets of wheels, and I plan to coat the other two sets soon.
Have experience using ceramic coating on your wheels? Leave a comment for your best application or maintenance tips.


Thanks for the detailed review. Very helpful as I’m getting my alloys refurbished and the shop offered to treat with C5 (for an additional cost). I was rather sceptical but will go ahead now.
Thanks Nick. Great article and advice.